Shetland Heritage Patterns - more news!

When I posted about the Shetland Heritage Fair Isle Jumper last week, eagle-eyed Felix spotted that the design was familiar to her. She pointed me towards Mary Jane Mucklestone's excellent 200 Fair Isle motifs, and sure enough, on page 35 there was a photo of a jumper that appeared to come from the same design!

How I wished I had seen that photo before I wrote the pattern for Jamieson & Smith... But all was not as simple as it at first seemed.

I was lucky enough to have worked with Mary Jane last year, when I edited her lovely hat and gloves for the Knit Real Shetland book, so I dropped her an email to ask her if she knew any more about this lovely Fair Isle jumper in the photo in her book. Despite being in the middle of deadlines and travelling, she was kind enough to email me straight back, to let me know that the photo was from the Shetland Museum Photo Archive. You can see the picture in question over on their website here: Fair Isle Allover Jumper in photo archive.

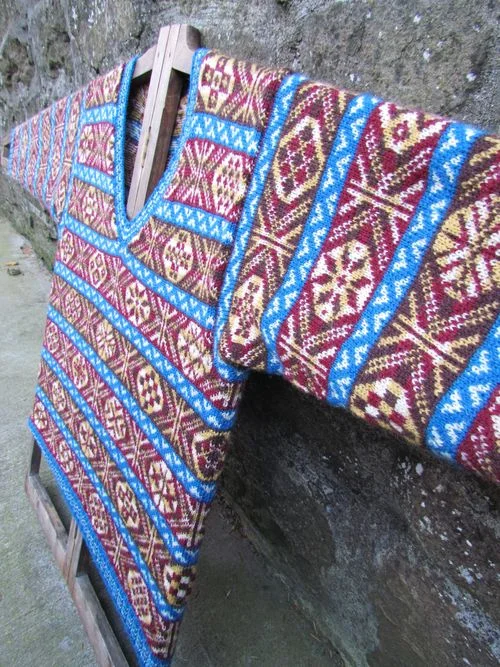
I was fascinated! On looking closely at the photo, it seemed clear that the design was the same. There are so many different Fair Isle motifs, all in exactly the same positions, that there was no chance that this was a coincidence. However, it was also clearly not a photo of the same jumper before it was worn and cut into pieces... If you look closely at the motifs on the bottom band, you can see that in the cut up jumper I worked on in the archives, the motifs are unsymmetrical and "incorrect", whereas those in the jumper in the photo are correct. I speculated all sorts of explanations for the design similarities!

I fired off an email to Carol Christiansen at the Shetland Museum and Archives, to ask her if she knew anything about the Fair Isle jumper in their photo archive. I received this information in response:

The jumper in the photo of SM01003 is a replica of the one in pieces that you looked at (TEX 8943).  We went through a period in the 1990s of having replicas made of some items in the collection, so they could be used for handling, etc. but they were never exact replicas, using modern yarns in colours that were available at the time.  The replica was hand-knit in 1993 of machine-made yarn and the knitter ‘corrected mistakes’ she felt had been made in the original.  

So the photo is of a new garment knitted from the cut-up jumper in pieces that I worked from in the summer. It is interesting to see where the new photo-archive garment, and the new pattern I've written differ - I think that most of the differences come from the fact that I was writing instructions that had to work as a printed pattern for other knitters, whereas the knitter in the 90s was just making a one-off piece. The charts would have been even more enormous if I had kept to the arrangement of different motifs on front and back!

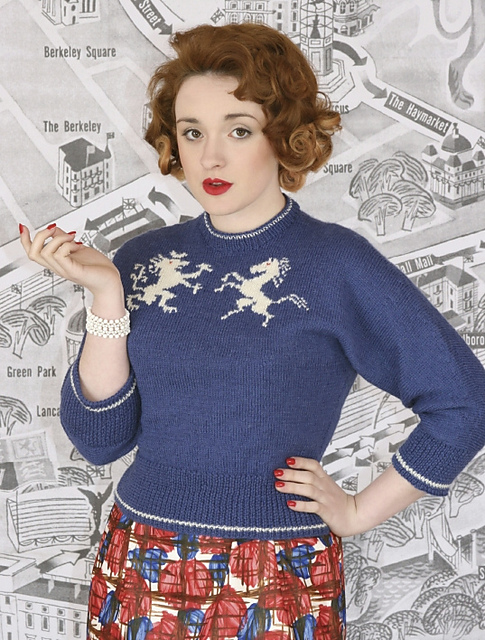
In related-news, Jamieson & Smith have released the kit for the Fair Isle Cap that I worked on at the same time. This is also a pattern written from an item in the archives.

That's a slightly bonkers-looking picture of me modelling it, when we were at J&S in October! It's knitted with a full lining, so there are 4 layers of fabric keeping your ears warm! Perfect for the icy cold weather we've had this week.

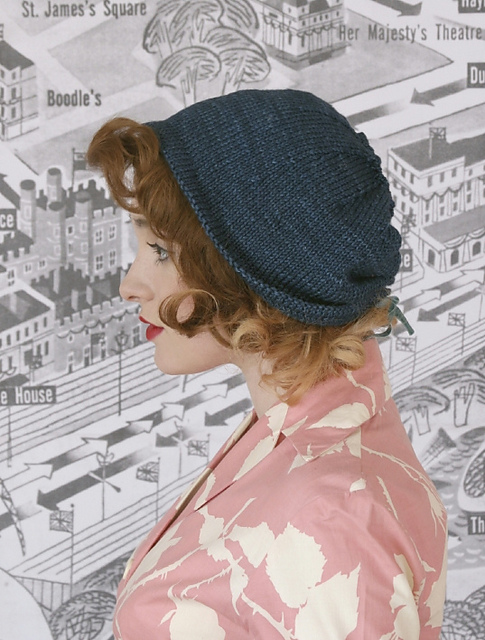
Here's a more sensible flat photo of it, so that you can see the lovely motifs incorporated:

Fair Isle Cap
© Jamieson & Smith

This hat also has a bit of story behind it, as it was purchased on eBay and donated to the Museum by Masami Yokoyama (designer of the delightful tea-themed tea cosy in Knit Real Shetland). It's a 19th Century hat, that was most-likely a fisherman's hat, designed and worn for work (unlike the jumper which was more of a fashion item). You can read more about how it was discovered and donated over on the Visit Shetland website here: Fair Isle Cap donated by Wool Week eBayer

As with the jumper, I've had to make some adjustments from the original artefact. The motifs were incomplete and confused up the back of the hat, as you can see below:

Fair Isle Cap2

And the folded-up brim was just left curling over. In fact, the brim appears to have been knitted at a different time to the rest of the cap, as the colours are not quite the same, and the yarns slightly different. Carol advised me that this was likely to have originally had a knitted lining, so that was the construction that I used in the new pattern.

Fair Isle Cap1
You can see the Fair Isle stranding poking over the top of the curled brim. There are pattern pages on Ravelry for both the jumper and hat: Shetland Museum and Archive designs

And both can be purchased as kits from Jamieson & Smith.

Happy knitting!

Shetland Heritage Pattern Release

Well it's all go around here at the moment! Kate's book (Colours of Shetland) is now on sale (scroll to the bottom of this post to purchase a copy), and at some point next week, I shall tell you all about how much I enjoyed working on it! But today I'm delighted to share with you some work that I did over the summer...

Jamieson & Smith approached me earlier in the year to work with them on some patterns for their new Shetland Heritage yarn. I blogged about how much I liked the new yarn when it first went on sale, but now I'm delighted to be able to show you one of the patterns I've written for it.

© Jamieson & Smith

This is the Fair Isle V-Necked Jumper (it is not my own design!). I was asked to study some garments held in the collection of the Shetland Museum and Archives, and to create knitting patterns for them. So the design is the work of the unnamed knitter who created the original pieces. I've not changed the colourway, or the construction; I've just tried to recreate the design as closely as possible. This is thought to be a fashionable men's jumper from the early 1920s (rather than a fisherman's jumper).

While we were in Lerwick in July, I spent a day happily transcribing the patterns, and Jim even joined me to help out in the afternoon! There was such detail in the original pieces!

Shetland Museum & Archives1

The V-Necked Fair Isle jumper from which this pattern comes wasn't in the best condition. It had been worn and loved to pieces! Above you can see what remained of the sleeves.

Shetland Museum & Archives11

Even the body had been cut into pieces! In fact, when it was first laid out in front of me, it had appeared to be a cardigan...

Shetland Museum & Archives4

It wasn't until we laid the piece flat that it was clear that actually it was a jumper that had been cut open up the side seam.

Then began the meticulous task of transcribing the stitch patterns. The motifs appear in a fairly random arrangement, with many of them being knitted "incorrectly" in the lower portions of the body, and later repeated with the mistakes ironed out. Jim noticed that in the band of patterns where the neck split occurs, new motifs are introduced, and the gauge changed somewhat. So we speculated that perhaps more than one person was involved in making this sweater? Or perhaps it was put to one side for a while, and the knitter returned to it having improved their skills on other projects. It was fascinating how much you could guess from just looking at the remains of a jumper!

It was quite a task to decide how best to recreate the design - I took the rib pattern from the cuff fragment and used it at the welt, neck and sleeve cuffs, since the original garment had just a few rows of two-colour stocking stitch and it was curling badly.

In the interests of keeping the pattern to a manageable number of pages I felt it was best to repeat the design on front and back, so the arrangement of OXO motifs that you see on the front in the picture above is repeated on the back. I have tried to keep the feel of a sampler piece however, and resisted the temptation to cut down the number of different O designs. If you wanted to, you could easily adjust the pattern to use just one or two designs, or go the whole way and mix them up with your own patterns, making each one different!

The jumper has been sized to fit chests from 32 to 48 inches (81-122cm), and is only available as a kit directly from Jamieson & Smith: V-Necked Fair Isle Jumper

IMG_1617
© Jamieson & Smith

I'm immensely grateful to Dr Carol Christiansen at the Shetland Museum & Archives for her assistance, as well as to Grace Williamson who did an amazing job of knitting up this jumper. Thank you both!

Coronation Knits: The Short Row Files

Today's post follows quite nicely from the theme of Thursday's post: 'things I learnt from technical editing jobs'. I'm delighted to be taking part in the blog tour for one of latest projects I've worked on, Coronation Knits by Susan Crawford. Susan has kindly offered a copy of Coronation Knits as a prize to one lucky reader, so read to the end for details of how to enter the giveaway.

There are going to be lots of posts about the beautiful designs in the collection, and the influences behind them, so today I thought I would take the opportunity to talk a bit about short rows. Bear with me. If you've not yet come across short rows, fear not, I shall walk you through them. Short rows are exactly what the name suggests - rows (or rounds) where you don't knit all of the stitches. If you work half way through a row, turn and work back to the end, and then carry on as normal, you will have slightly more fabric on one side of your piece. You will also have an unsightly hole at the point where you turned. Short-row shaping is actually very simple - it lets you add more fabric in specific areas and thus can create 3-dimensional shape in your knitting. The trick involves closing up the holes that form when you turn.

© Susan Crawford, 2012

There are three designs in the book that feature short-row shaping: Lion and Unicorn (above), Blue Riband Hat and Retro Jubilee Socks (those are all Ravelry links).

The Lion and Unicorn jumper was my first love in the collection - it was the first design we worked on, and the elegance of its shape and design really appeals to me. The pattern is based on a design from the Special Coronation Edition of Stitchcraft magazine (1953), where the jumper is knitted in two pieces (front and back). The shoulders were shaped with a long series of cast-off rows, thus giving the original design a seam along the top of the shoulder and sleeves. When Susan started looking at updating the jumper (and adding all the additional sizes - the original is 1 size only), she decided that it would work really well knitted in one piece from front to back, with the shoulders shaped instead by short-rows, thus eliminating the seam. Susan isn't a designer who gets rid of seams willy-nilly - in fact, she's a great proponent of the benefit of seams to provide structure and good fit in garments - so when Susan gets rid of a seam, you know that there's an excellent reason for it! The smooth slope of the shoulders and sleeves is just so pleasing - a seam would really mess up that line in my humble opinion.

Lion and Unicorn uses probably the most common short-row turn method: wrap and turn (w&t). There are lots of tutorials for working wrap and turn short rows, so here are a couple to get you started:

Working the wrap and turn itself (a video from Knitting Help)
Knitting the wrap with a stitch (another video from Knitting Help)
Working the wrap and turn and knitting them together on following rows (a photo tutorial from Purl Bee)

© Susan Crawford, 2012

The stylish cloche hat, Blue Riband (above) also uses the wrap and turn technique - this time working in the round. Short-row shaping is used here to add extra length to the back portion of the hat (this same method is often used to add height to the back neck for yoked jumpers). The basic premise is exactly the same as above, it's just that you are working in the round, rather than flat. If you are finding that your wraps aren't completely concealed when you work back over them, try knitting the wrap and stitch together through the back loop.

Which brings us nicely to the Retro Jubilee Socks and the new thing I learnt. These socks feature a new-to-me technique for working the short rows in the heel - the slyo or slipped yarnover method. A quick search on Google revealed only a few references to this technique, and no proper tutorials (although I feel sure there must be some out there somewhere - do leave a link in the comments if you find one and I'll add it here), so I thought it might be handy to walk you through it.

© Susan Crawford

The cuff and leg of these socks are knitted in the round as normal, and in essence the heel is a standard short-row heel, it just uses a different method for closing the holes on turning. The following short video takes you through the process.

Tutorial for the slyo (slipped yarnover) heel turn used in the Retro Jubilee Socks by Susan Crawford. These are part of the Coronation Knits collection.

The next stop on the blog tour is Hélène Magnússon (The Icelandic Knitter) on Monday 18th June 2012. Make sure to stop by!

If you can't wait to get your hands on a copy of Coronation Knits you can purchase the collection in the following ways:

Print Book for £12.99 or eBook for £10 both available from Susan Crawford.

Susan has kindly donated a copy of Coronation Knits for one lucky reader (there are giveaways on many of the stops on this blog tour, so do check them all out - full details below). To enter the competition, please leave a comment on this blog post, and tell me what your favourite knitting technique is and why (comments not including this information will be excluded from the selection of the winner). One reader will then be chosen at random from the eligible comments on this post. The prize can be sent anywhere in the world. Only one entry per person please - duplicate entries will be deleted. Comments will close automatically exactly 1 week from publication of this post. All prizes will be sent out after the blog tour is complete at the end of July 2012.