

I have had thoughts about decreases going round in my head for a few weeks now. Today I’ve finally had time to sit down and try to shepherd them into some kind of order…

My Wearing Jumper, designed by Donna Smith, features a neat line of k2tog decreases up the side of the neck shaping, below the deep ribbed collar.
I thought it would be interesting to compare the neckline decreases on my two most recent garment projects. Above is the Wearing Jumper (Ravelry link), designed by Donna Smith, that I finished at the end of last year. And below is a Fair Isle Tank Top, based on the Silwick Vest (Ravelry link), designed by another Shetlander, Sandra Manson, that I recently completed for Jim.

The decreases in this variation on the Silwick Vest by Sandra Manson are less obvious because they are worked perpendicular to the slope.
The decreases are far less obvious on the tank top, and this is because for colourwork, the decreases are worked perpendicular to the slope of the neckline.
As a quick recap, for a slope that leans to the right (like this slash: /), as both of the necklines shown above do, working consecutive k2togs (knit next 2 stitches together) will make a neat line of decreases as shown in the top image of the Wearing Jumper. For a slope leaning to the left (like a backslash: \), a line of ssk (slip 1 stitch knitwise, slip 1 stitch knit- or purlwise, insert needle into the front of the two slipped stitches and knit them together through the back loops) decreases will give the same effect. There are a number of alternative left-leaning decreases available, but for the sake of simplicity I’m just talking about ssk today.
So why are the decreases worked differently in these two projects?
The answer lies in the colourwork. When you work a decrease, you cause the two stitches from the row below to be placed one over the other. In a colourwork design, the two stitches may be of different colours. In this case, it is important that the stitch that ends up on top is the correct colour to keep the colourwork looking correct. Here are some charts to show what I mean:

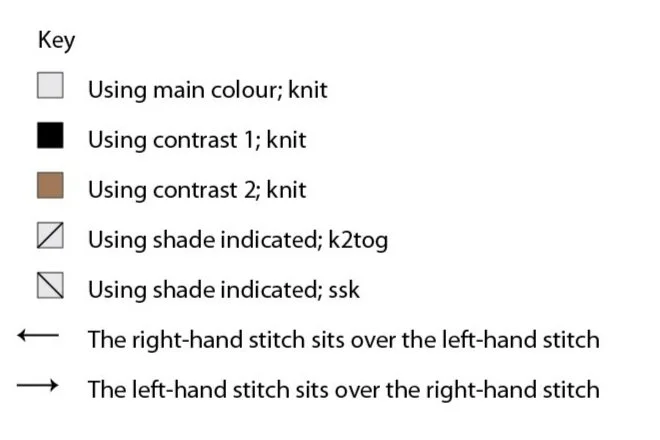
The above chart shows the small (peerie) Fair Isle motif I used in Jim’s tank top. The ssk decreases are shown on the chart, and I have added arrows to show the effect on the two stitches from the row below. For each pair of stitches, the right-hand stitch will sit over the left-hand stitch. So for example, on row 6 the brown stitch will sit on top of the cream stitch. The resulting knitting will look like this:

If you look in particular at rows 6 and 8, where the two stitches below the decrease were in different colours, you will see that the colourwork pattern is correct across those rows.
Now compare how it would look if we did k2tog decreases instead:

This time, the left-hand stitch will sit on top of the right-hand stitch (as shown by the arrows on the chart). On rows 2, 4, and 10 both stitches on the row below are the same colour, so no difference is visible, but on rows 6 and 8, the left-hand stitch will now sit over the right-hand stitch. The resulting fabric will look like this:

If you look at the far left stitches on rows 6 and 8 you will see that they are not the correct colour that you would expect according to the pattern repeat.
This is of course just a really small detail, but if you have a stretch of complex colourwork, using decreases that sit perpendicular to your slope will give the neatest finish.
As ever, you are the boss of your knitting, so you should work whichever decreases please you the most, but I hope that this article has given you some food for thought.